Visual Testing overview
Visual Testing is designed to aid functional testing, which focuses on software behaviors and might let visual issues slip into production. It aims to ensure the user interface (UI) of web and mobile applications appear to end users exactly as intended, across various platforms.
Visual Testing works by auto-comparing and displaying differences between specific UI snapshots in the initial run and subsequent runs, with the help of AI. With Visual Testing, human error becomes minimal, as even minor differences are captured, which human eyes often miss.
Get Started with Visual Testing
- Include
takeScreenshotAsCheckpointkeywords in your test cases. Make sure the test suite (TS)/test suite collection (TSC) contains this test case. - Choose one integration option with TestOps:
- GitHub: See Github Integration to learn how to set up. This integration allows direct test execution from your GitHub repository on TestOps.
- Katalon Studio: See Integrate TestOps with Katalon Studio for more information. This integration allows test executions from Katalon Studio to be uploaded to TestOps, including screenshots for Visual Testing.
1. Create a baseline collection
Auto-generate baseline collection with test execution
- Execute the test suite/test suite collection:
- If you have Katalon Studio integration: execute directly inside Katalon Studio.
- If you have GitHub integration: create an automated execution, toggle Visual Testing > Generate a new Baseline Collection, and Run Now or Schedule.
During execution, a takeScreenshotAsCheckpoint keyword saves a screenshot of the app's UI (WebUI or Mobile) into the baseline collection.
- Once execution completes and reports are ready, you can view the baseline collection images in Assets > Visual Baseline Collection and update manually by uploading new baseline images, and delete obsolete ones.
Manually create a baseline collection by uploading images
- Go to Assets > Visual Baseline Collections. Click the Create button at the upper right corner to open the Create Baseline Collection window:
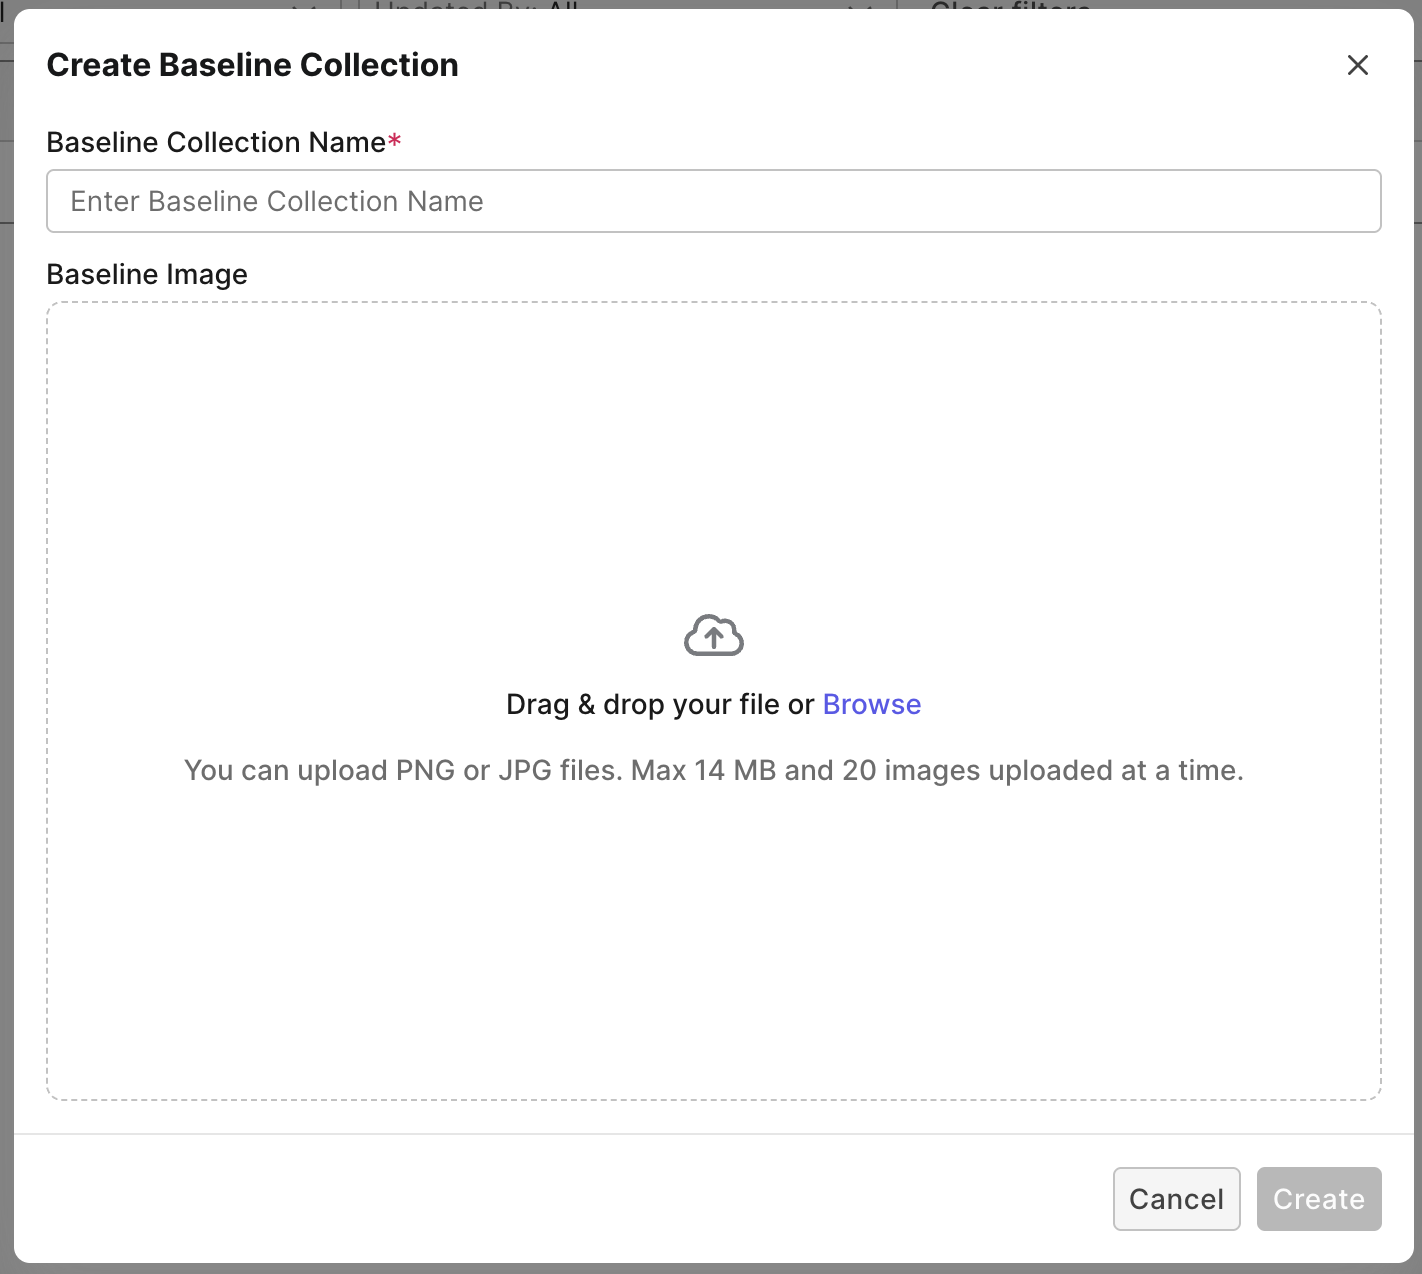
- Upload Baseline Images and give the collection a name.
- Click Create.
2. Execute/Schedule the same test for visual comparison
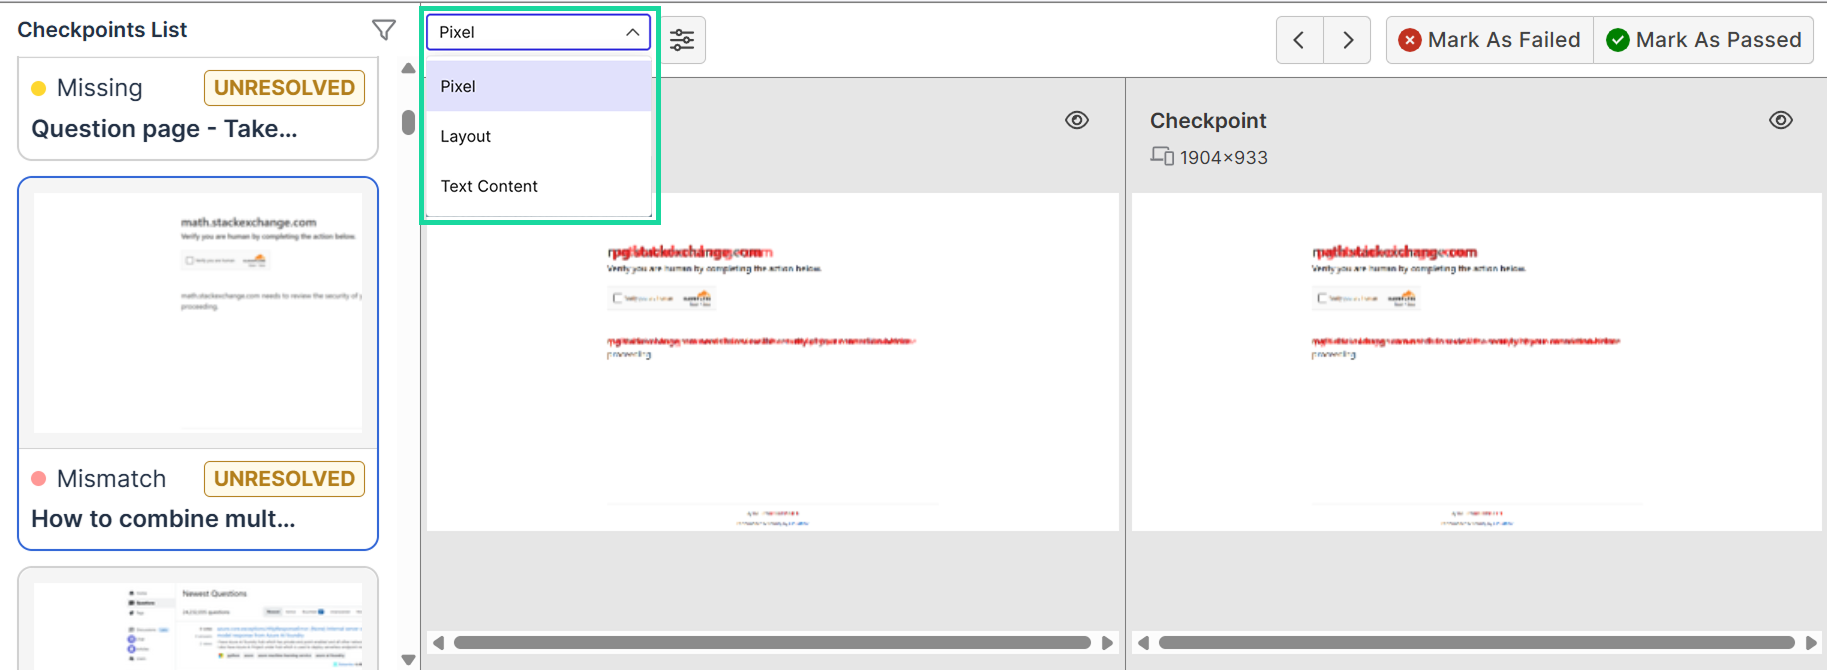
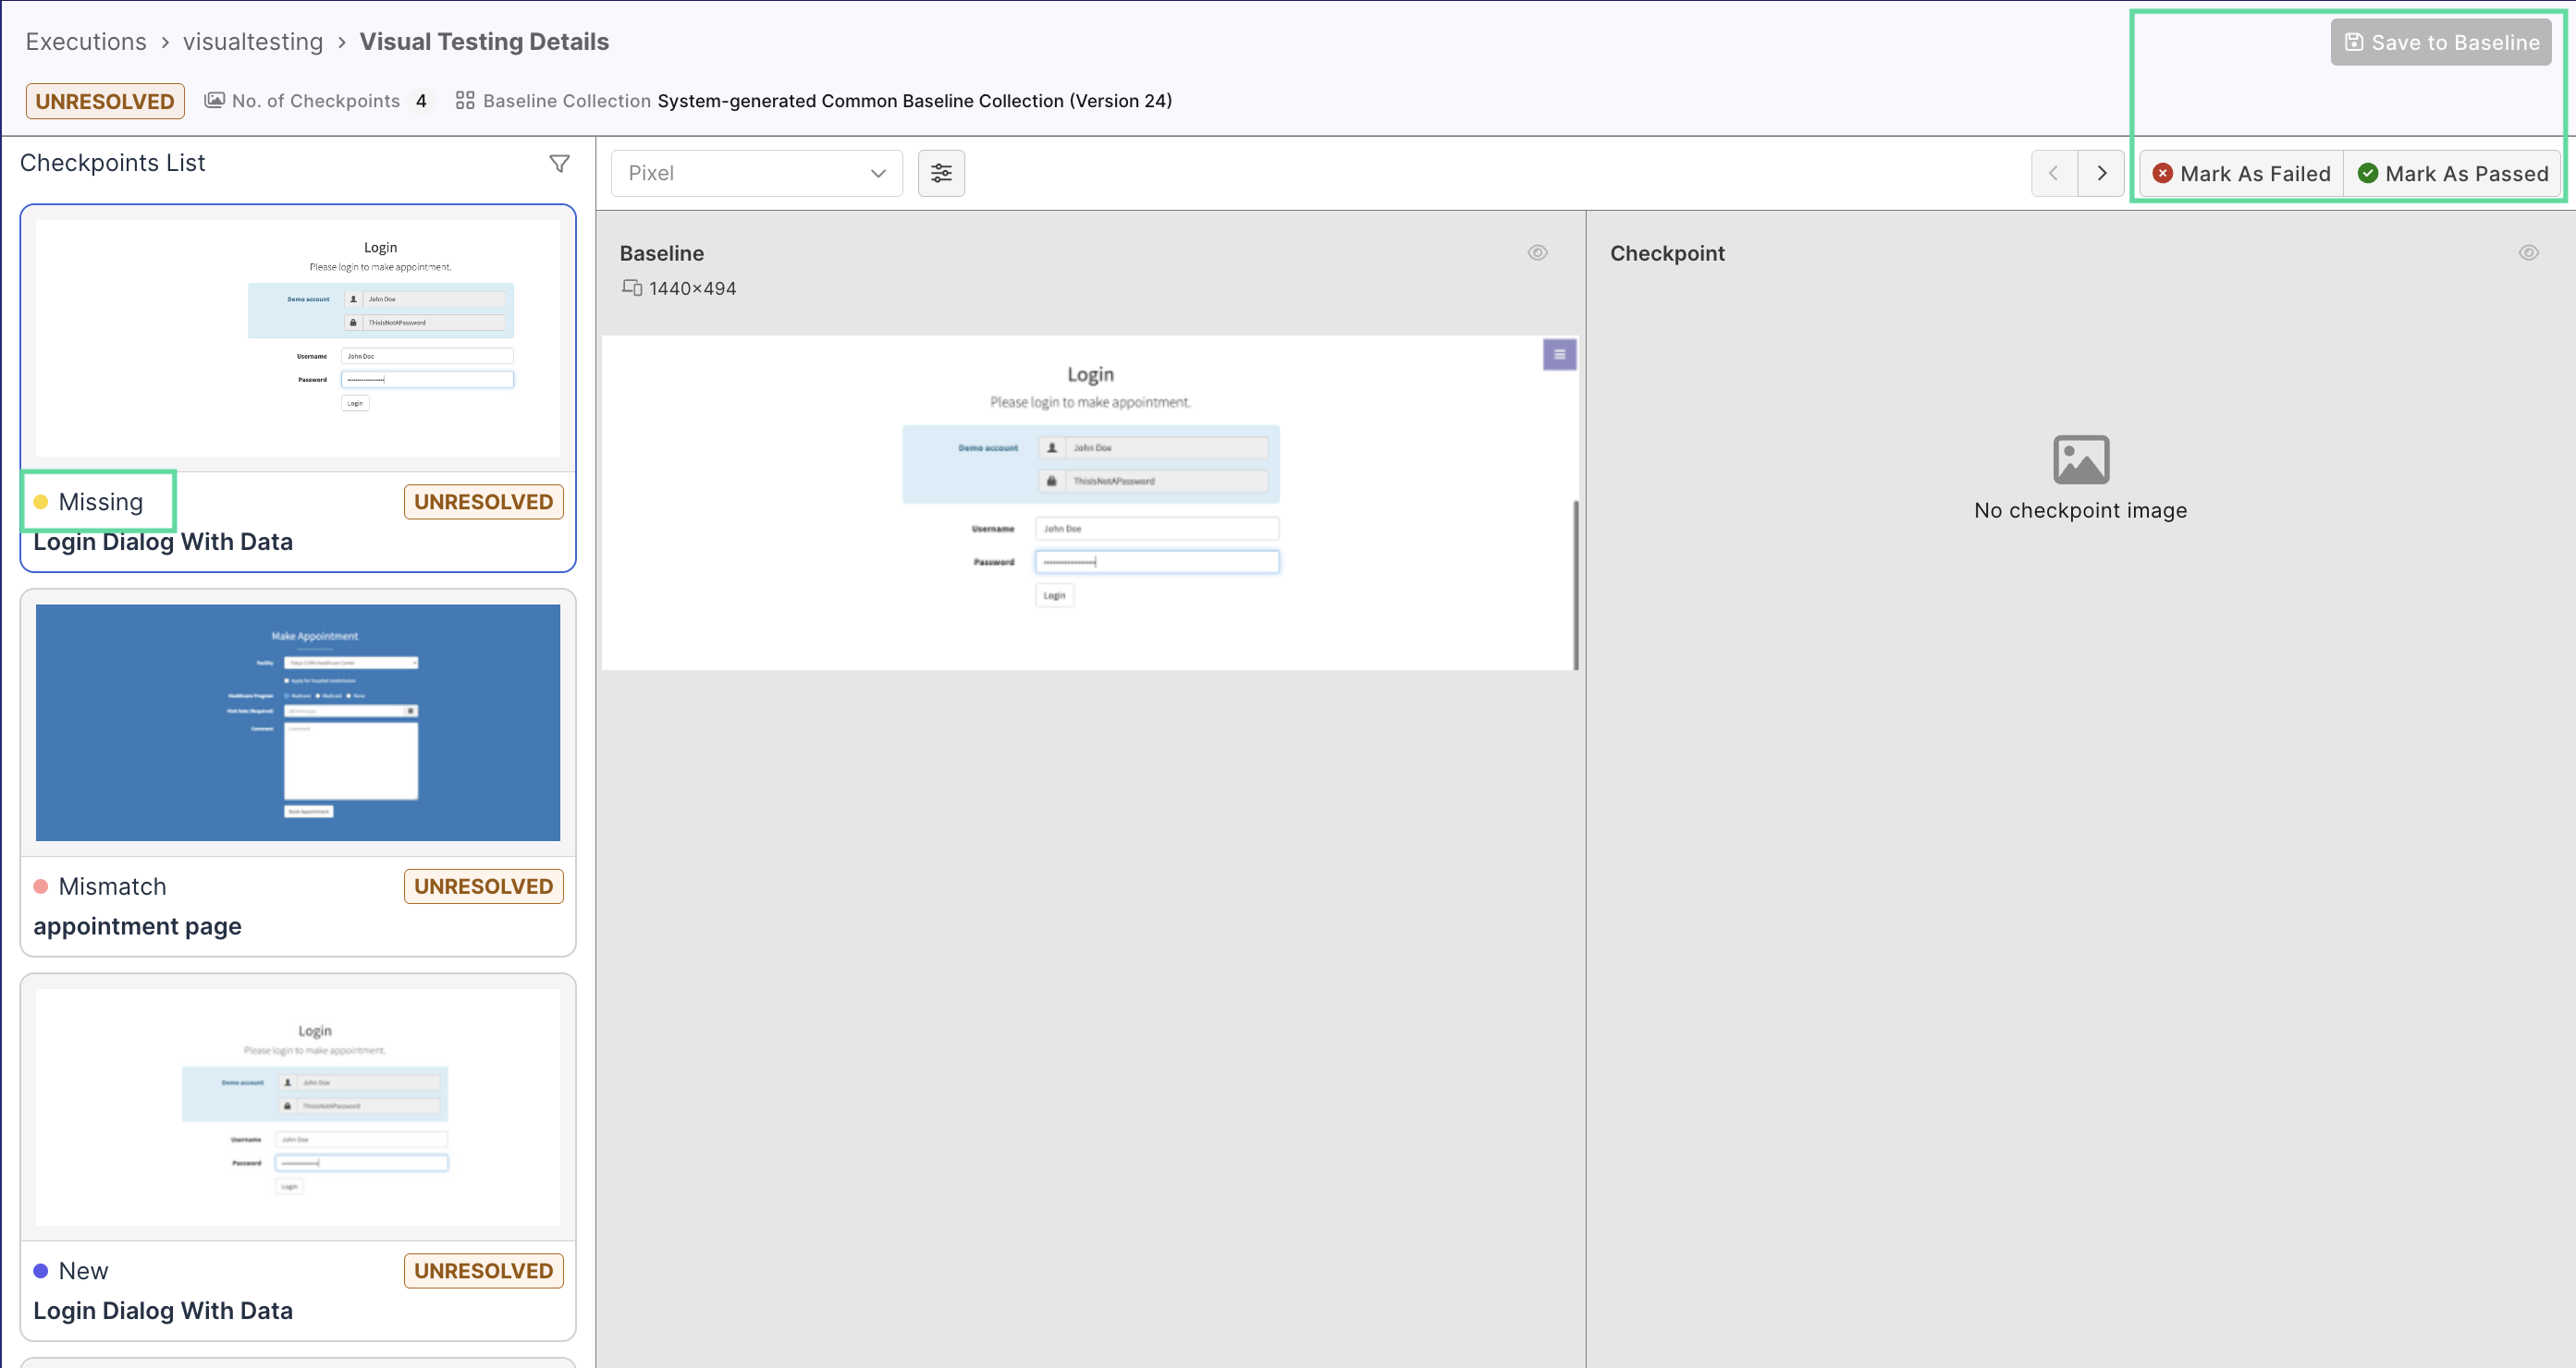
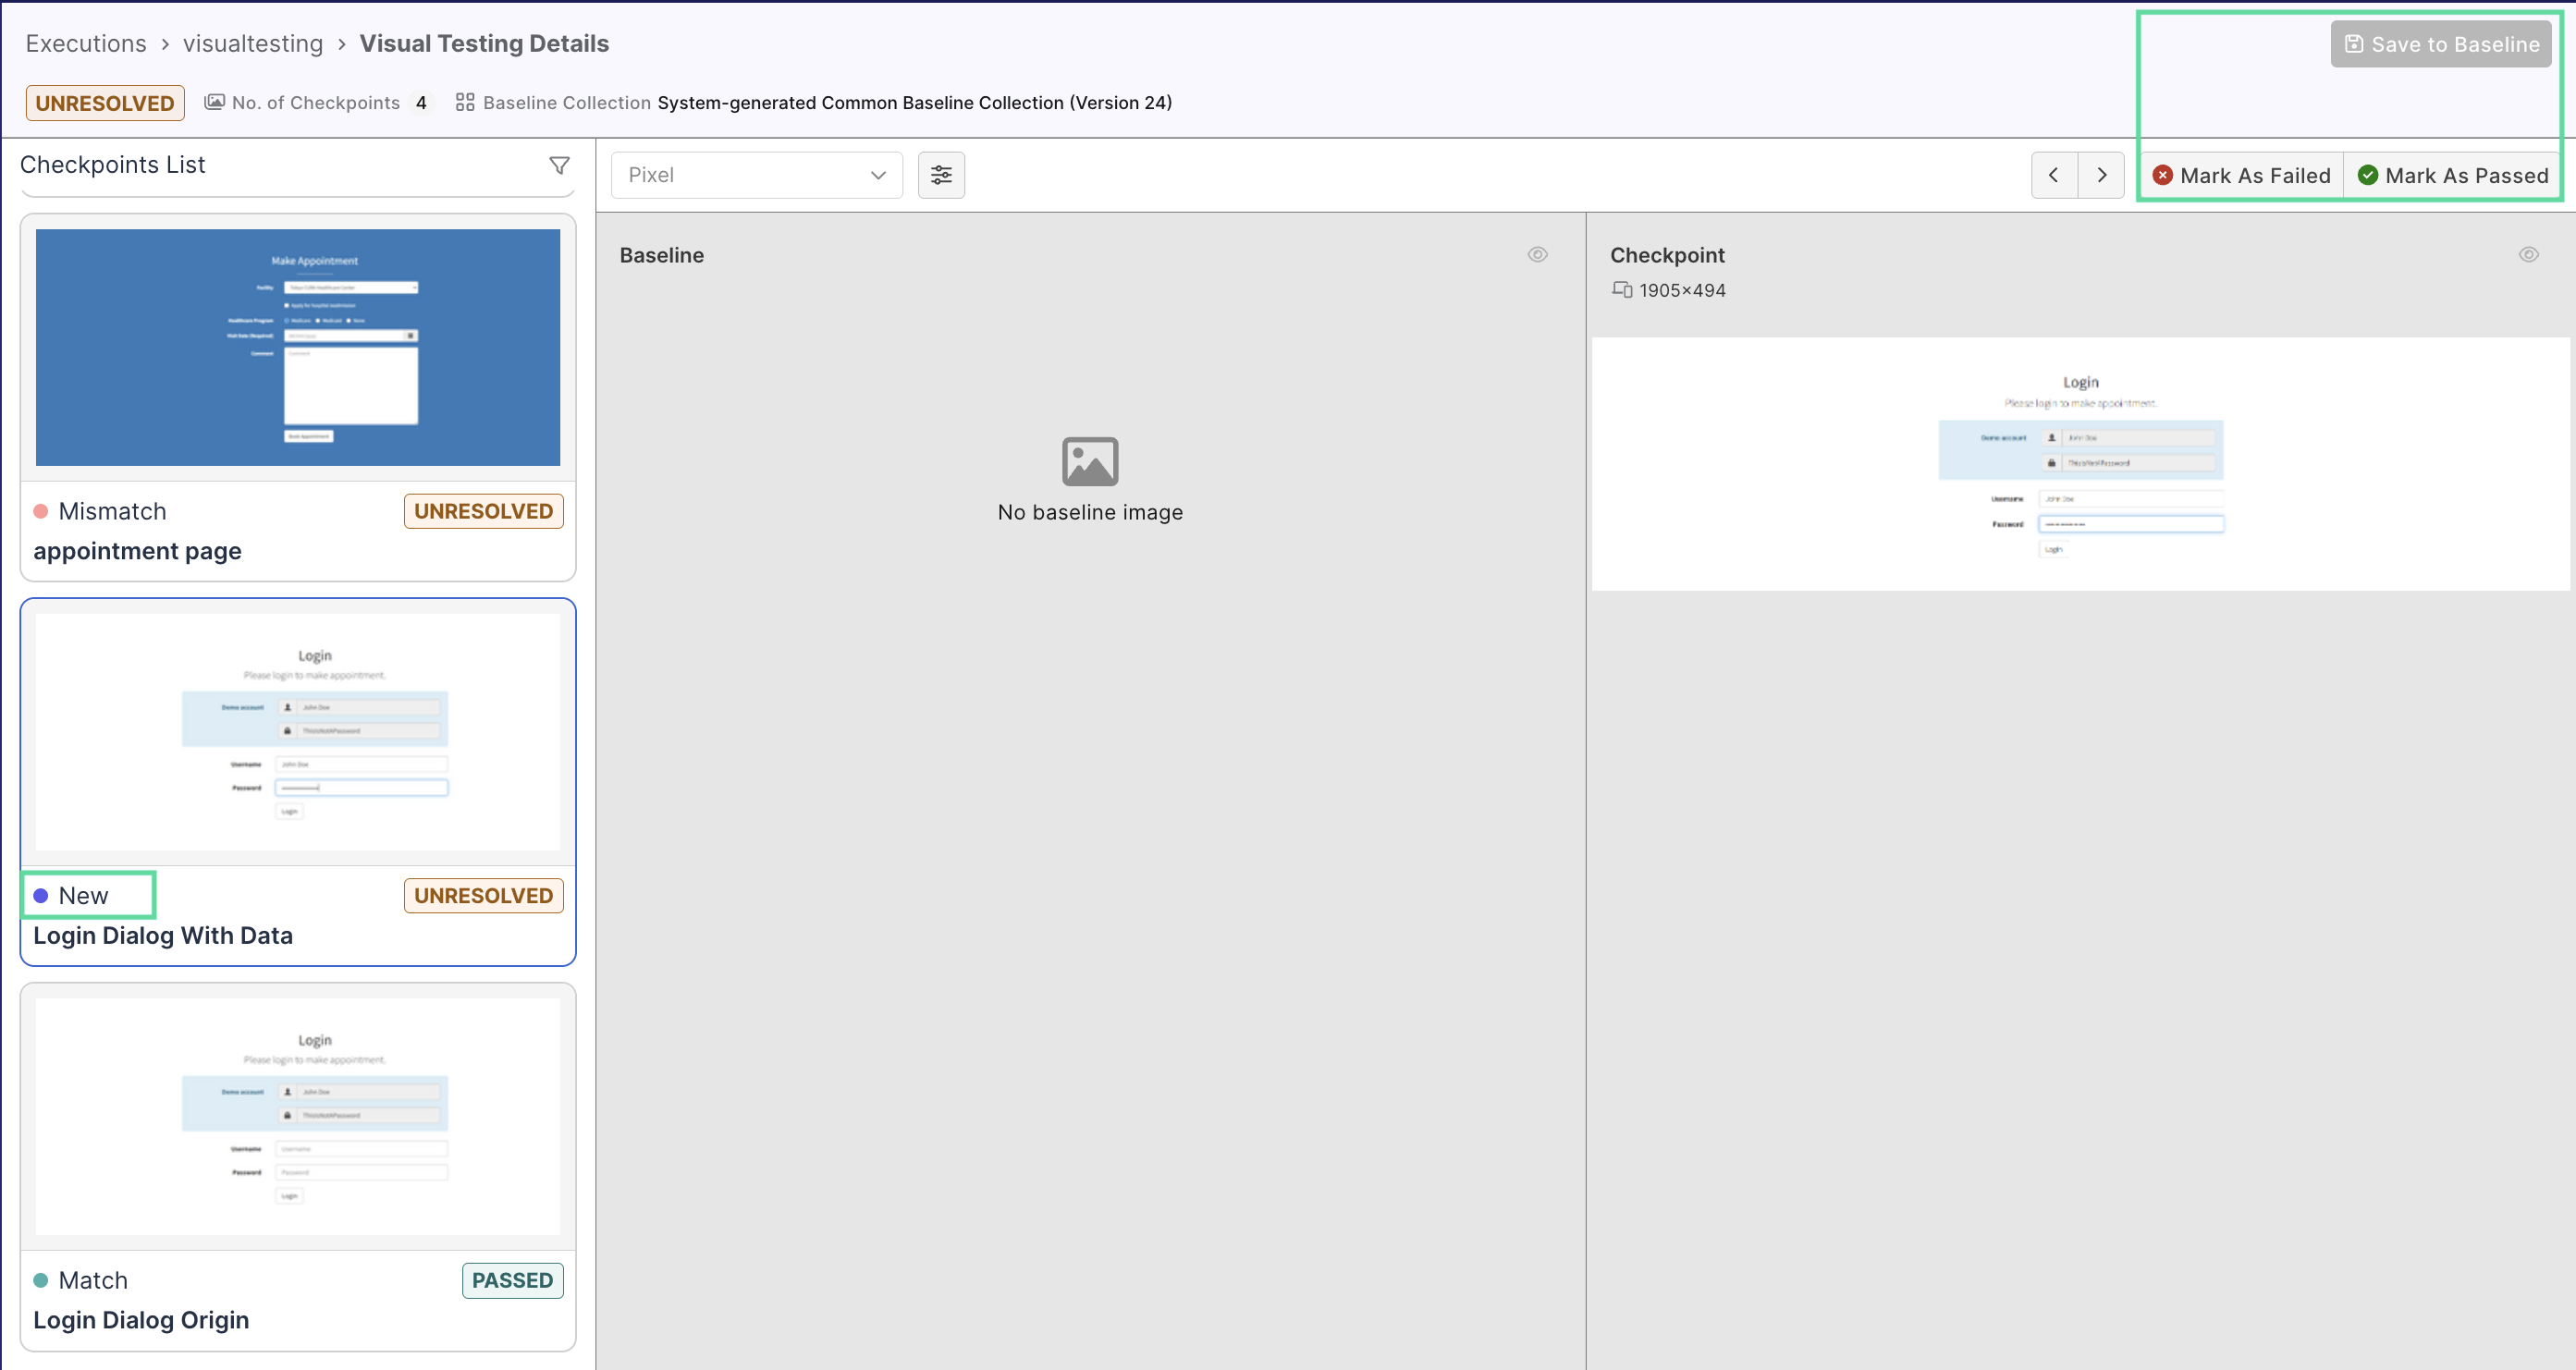
As you execute/schedule the test for subsequent runs, new images will be generated, called "checkpoints", and to be compared with those in the baseline collection. Navigate to your specific project's UI > specific execution > Visual Testing to view the checkpoints' statuses:
You will see checkpoints marked as Resolved or Unresolved:
- If a checkpoint matches with the baseline image: its status is Match, and automatically marked Resolved. Nothing to do further with this checkpoint.
- If Visual Testing detects anything unusual, the checkpoint is marked Unresolved. You can finalize each checkpoint depending on its status:
- Mismatch
- Missing
- New
Baseline and Checkpoint exist, but mismatch → Visual differences detected.
Action: Select a comparison method to see differences (enabled only for Mismatch):
Learn more about comparison methods at Visual Testing comparison methods
Once you're done checking, click on either:
- Mark as Passed → Accepts the checkpoint. You can then click Save as Baseline to add/replace the according baseline with this checkpoint.
- Mark as Failed → Rejects the checkpoint. The baseline remains unchanged.
Baseline exists, Checkpoint missing → The element was not captured in the latest run.
Once you're done checking, click on either:
- Mark as Passed → Accepts the checkpoint. The baseline remains unchanged.
- Mark as Failed → Rejects the checkpoint. The baseline remains unchanged.
Checkpoint exists, Baseline missing → A new element was captured without a baseline.
Once you're done checking, click on either:
- Mark as Passed → Accepts the checkpoint. You can then click Save as Baseline to add this checkpoint as a new baseline.
- Mark as Failed → Rejects the checkpoint. The baseline collection remains unchanged.
3. Configure pixel sensitivity and ignored zones (Optional)
These configurations can help enhance image comparison algorithm in Visual Testing. See Advanced configurations for Visual Testing for more details.
Visual Testing comparison methods
TestOps offers visual testing with three image comparison methods: pixel-based, layout-based, and content-based comparison.
- Layout-based comparison
- Content-based comparison
- Pixel-based comparison
This method compares pixel-by-pixel differences between the baseline and checkpoint images:
This method's advantage is simplicity: it identifies pixel differences and picks up minor changes that otherwise seem trivial.
This method highlights layout differences between the baseline and checkpoint images. It does so by identifying similar zones between the two, with the help of our AI engine:

You can choose to view specific zones, marked by color-coded grades of difference:
| Label | Color | Description |
|---|---|---|
| Identical | Green border | UI zones identically rendered in both images. |
| Distinguishable | Red border | UI zones that look identical for the most parts but have some recognizable distinctions. |
| Missing/New | Pink border | UI zones that exist in one image but not in the other. |
This method looks at differences in the text contents:
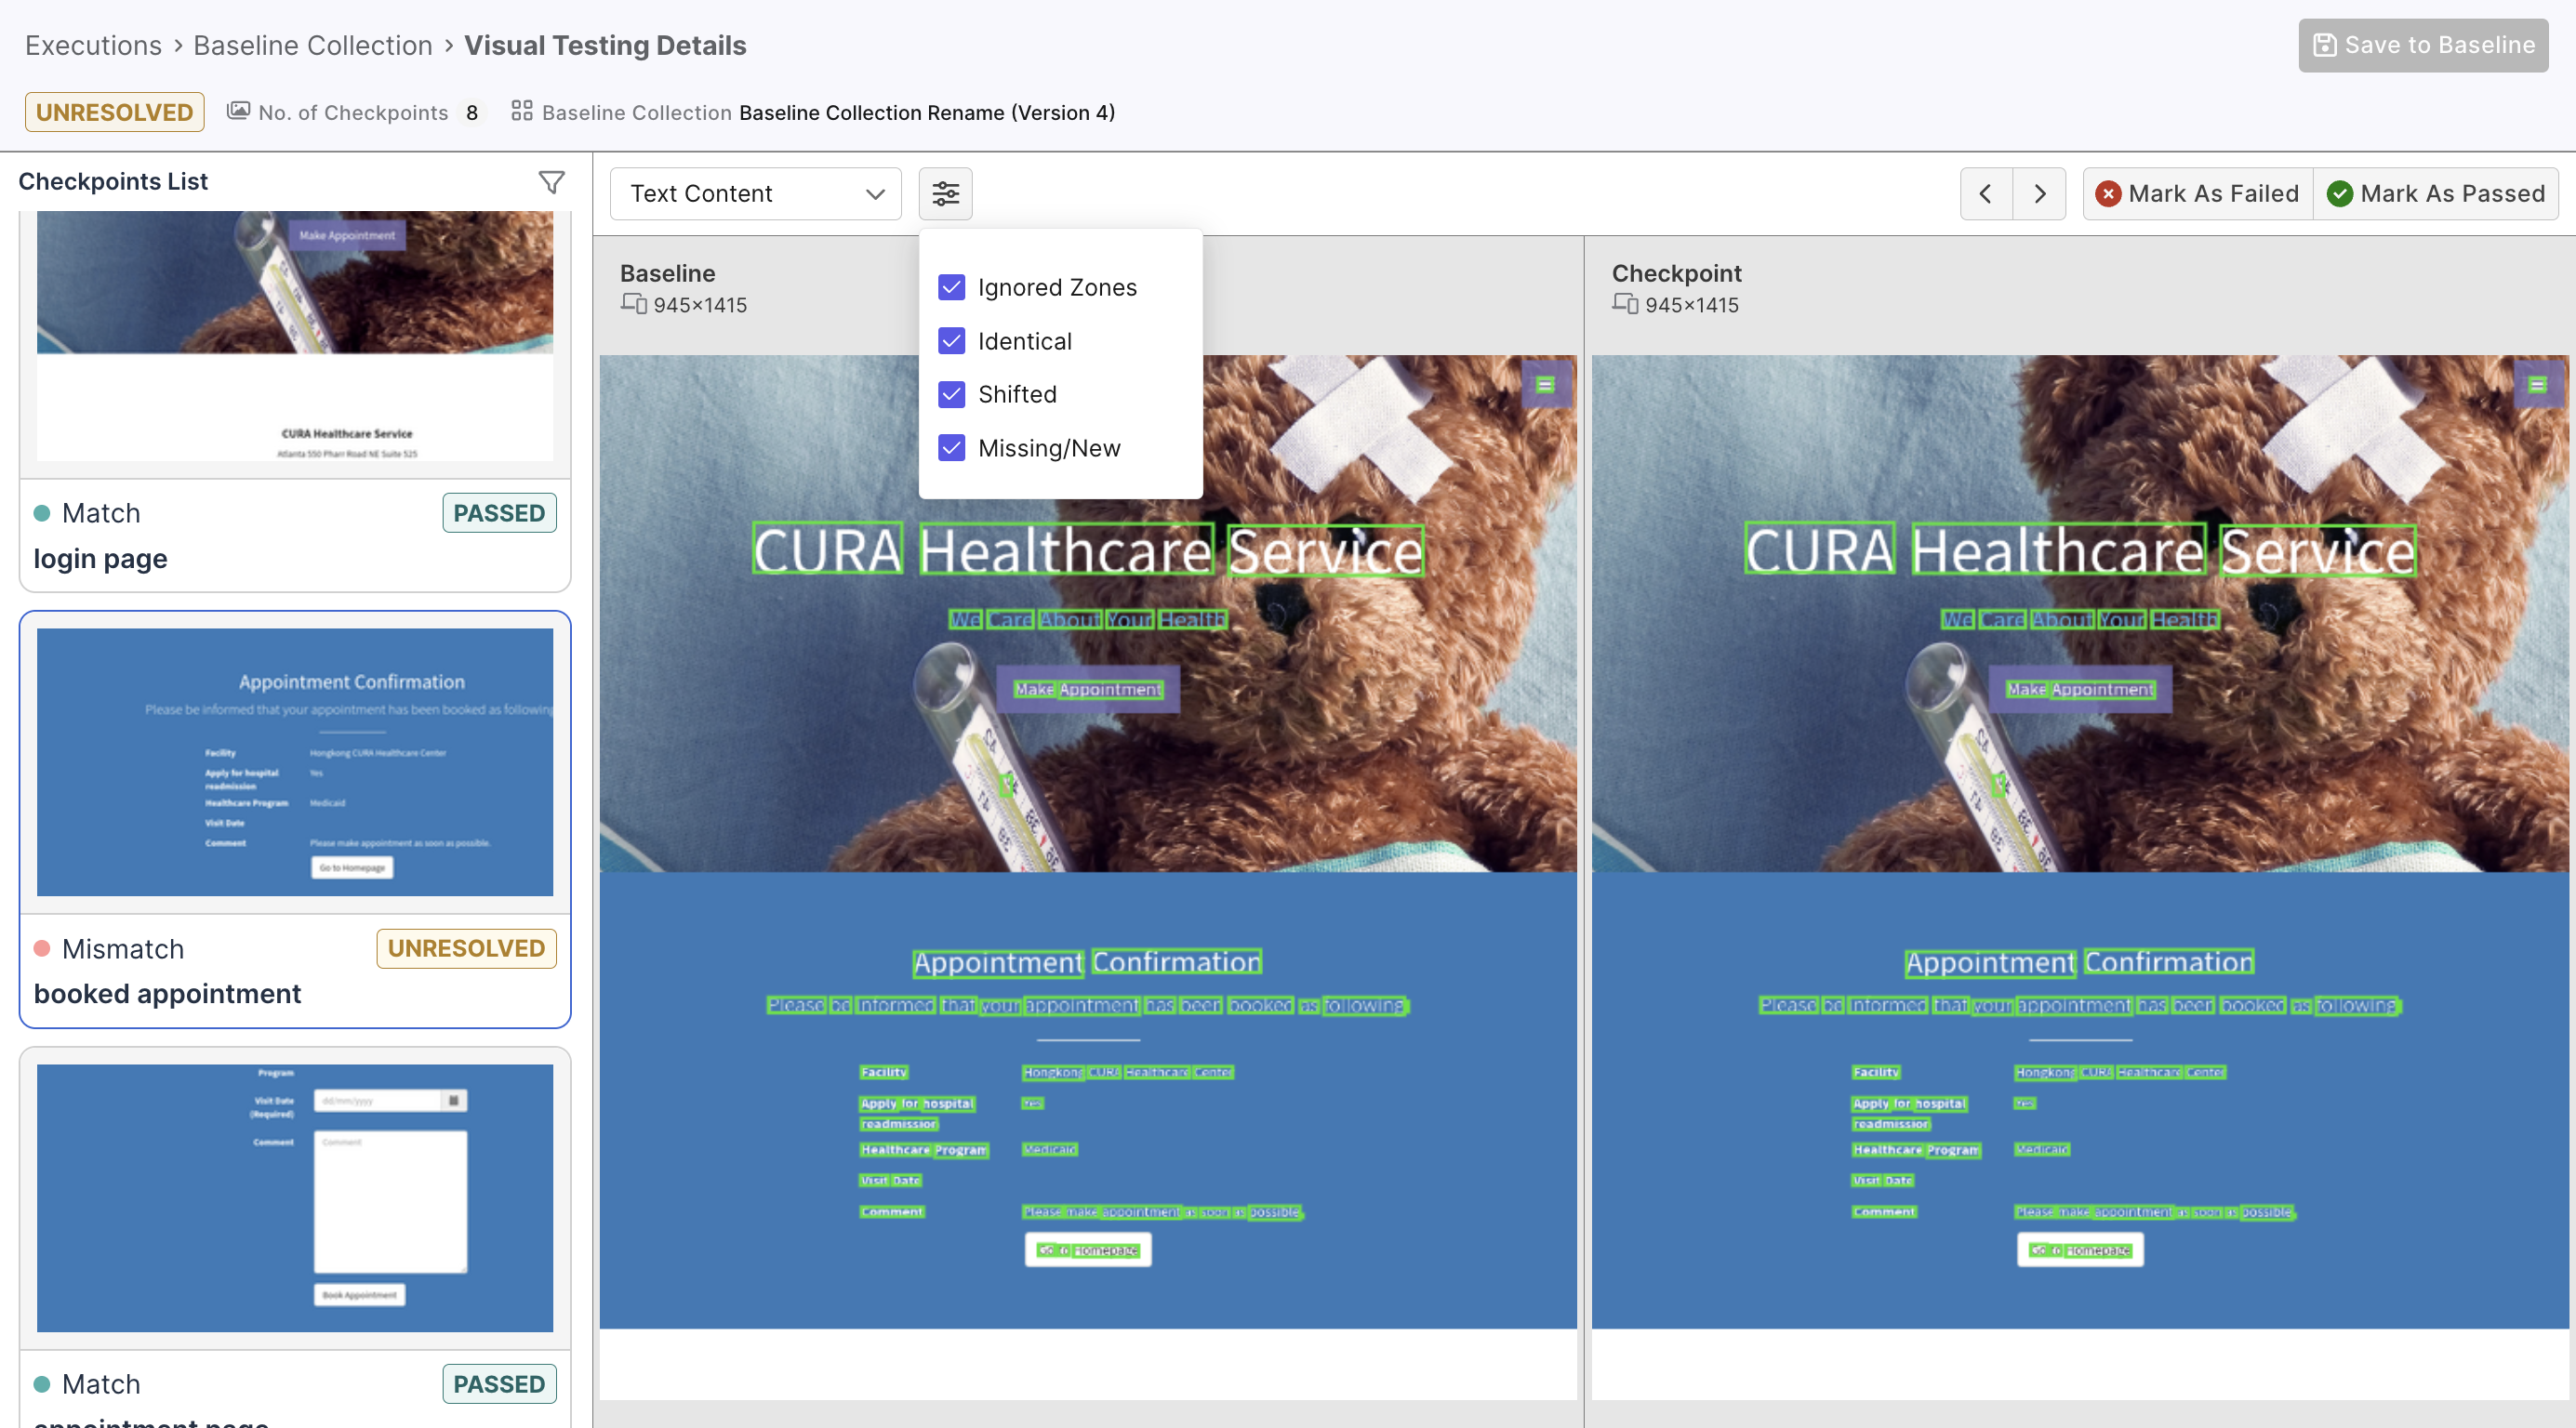
Text differences are also categorized and color-coded:
| Label | Color | Description |
|---|---|---|
| Identical | Green border | Shows text-look-like zones identically rendered in both images |
| Shifted | Red border | Shows text-look-like zones with identical but shifted positions |
| Missing/New | Pink border | Shows text-look-like zones in one image but not in the other. |
This method is useful when the snapshot contains lots of text content, enabling quick review and prioritizing of critical text changes.